Schedule

The “Schedule” feature allows you to schedule the execution of (part of) a selection flowchart (on a recurring basis) and run it on the desired day and time.

Drag a schedule block onto the worksheet. Connect the schedule block to one or more selection blocks.


Double-click the schedule block to open the settings.


The settings screen for a schedule block contains the following two tabs:

Tab

Description

Settings

Create, add, edit, and validate a schedule.

Notifications

Configure who receives a notification email when the system starts, stops, or encounters an error.


Multiple schedules

It is possible to place a schedule block at the top of a selection flow to execute the underlying selection flow.

Please note: The order of execution is important when there are multiple schedules.

Types of Schedules

Open the block to set the schedule.


The following schedule types are available:

No.

Option

Description

1

Recalculate

The selection is recalculated when the schedule is run

Note: The default setting for recalculation is “on.”

2

Type

Select the desired pattern

  • One-time: The schedule runs once on a selected date and time

  • Periodic: The schedule runs according to a periodic pattern over a specific period of time

    o Several times a day

    o Daily

    o Weekly

    o Monthly

Note: To run a selection flowchart on a recurring basis (multiple times a day, daily, weekly, monthly), you must define the desired schedule. And when opening a new schedule block, the type is set to "One-time" by default, with the current date and time prefilled. You do not need to save the schedule to see a value displayed. Adjust the date and time as needed, or select "Recurring" to create a repeating schedule pattern

3

Every

Select every X weeks and the desired day(s) of the week

4

Several times a day or at a set time

Select a specific time or choose “Several times a day”

5

Period

Select the desired time period by choosing a start and end date

6

Time Zone

Select a time zone to make a selection in that time zone

7

Description

Description of the specified settings in plain text (automatically populated). Because the type is prefilled by default, a description is already displayed when opening a new block


Notification

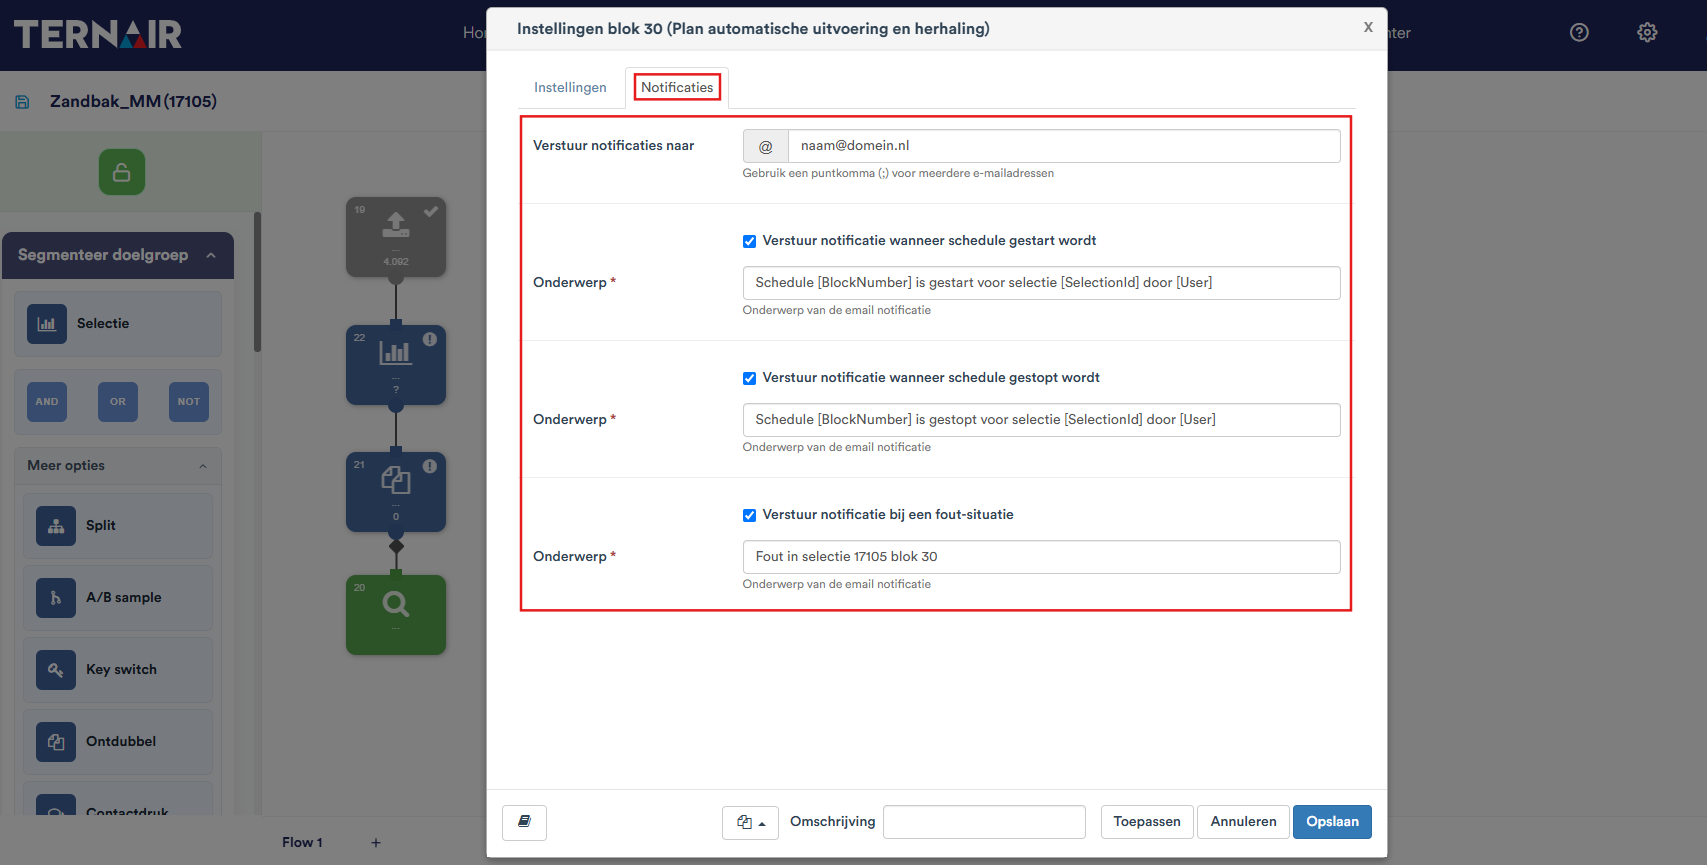
On the "Notifications" tab, you can specify whether a notification email should be sent regarding the schedule block.

Under "Send notifications to," enter one or more email addresses, separated by a semicolon (;).

Next, check the boxes next to the notifications you want:

Option

Description

Send a notification when the schedule starts

Notification when the schedule starts

Send a notification when the schedule is stopped

Notification when the schedule is stopped

Send a notification when an error occurs

Notification when execution fails, for example, due to an error in the block or flowchart, or due to a timeout


For each checked option, a required "Subject" field appears with default text. You can customize this text. Fields enclosed in square brackets, such as [BlockNumber], [SelectionId], and [User], are replaced with the current values when the message is sent. In the event of an error, the subject is automatically populated with the relevant selection and block numbers.

The notification email contains details about the campaign, the selection, and the block for the relevant schedule.


Start Schedule

To start the schedule, right-click on a schedule and select “Start Schedule.”


After you click “Start Schedule,” the schedule becomes active. An active schedule will execute all the steps of the selected schedule pattern in the selection flowchart to which the schedule block is linked.

An active schedule can be identified by the spinning green (arrow) icon.


To stop a schedule, right-click on it and select “Stop Schedule” from the context menu.


Example

Example of a weekly schedule:


Example of a one-time schedule:


Video


Copyright © 2026 Ternair.